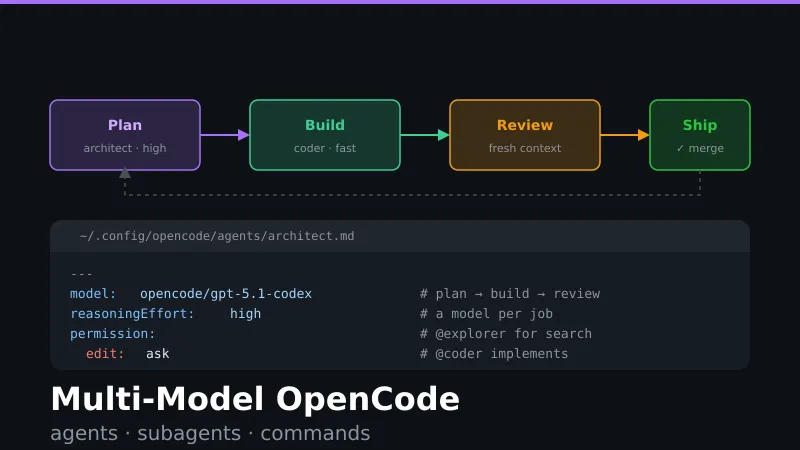
Set Up a Multi-Model OpenCode Workflow in 30 Minutes
Quick reference
| I want to… | Use |
|---|---|
| Keep noisy work out of my context | Subagent |
| Reuse a prompt I type constantly | Command |
| A shortcut that’s isolated | Command + subtask: true |
| A genuinely clean slate | /new (Tab switching won’t do it) |
| Restrict what an agent can do | permission (not the deprecated tools) |
| Allow one bash command but not others | permission.bash with "*" first, specifics after |
| Control which subagents can be called | permission.task |
| Generate an agent interactively | opencode agent create |
Most people install OpenCode, use the default Build agent, and never touch the rest. That works — but you’re leaving the interesting part on the table: OpenCode lets you assign a different model to every agent, so you can use a heavy reasoning model for planning and a fast cheap one for typing out code.
This tutorial walks through a working setup. By the end you’ll have three agents, three subagents, and three commands that turn into a repeatable plan → build → review → ship loop.
The mental model
Three concepts, and one rule that tells them apart:
| Thing | What it is | Context |
|---|---|---|
| Agent | An assistant you talk to. Switch with Tab. | Your main conversation |
| Subagent | A specialist that gets delegated to, or @-mentioned. | Its own — you only see the result |
| Command | A /shortcut for a prompt you run often. | Caller’s context or a fresh one — your choice |
The rule: commands share your context by default; subagents never do.
That’s the entire design. Everything below is just applying it.
Two things worth knowing up front, because they surprise people:
- Switching agents does not clear context. Tab-switching from your planner to your builder carries the whole conversation along. If you want a clean slate, use
/new. - A command can be forced into isolation by setting
subtask: true, even if it targets a primary agent. This is how you get a fresh-context review without building a subagent for it.
Step 1: Decide which model does what
This is the whole reason to bother. Split by job:
- Planning — your most capable reasoning model, high reasoning effort. This is where mistakes are expensive.
- Implementation — fast and cheap. It’s transcribing a plan, not inventing one.
- Review — mid-tier. Needs judgment, doesn’t need to be brilliant.
Run opencode models to see what’s available to you. The setup below uses a Codex-class model for planning and the Claude line for building, but the pattern is what matters, not the specific IDs.
Step 2: Create your primary agents
Agents live in markdown files. Global goes in ~/.config/opencode/agents/, project-specific in .opencode/agents/. The filename becomes the agent name.
~/.config/opencode/agents/architect.md:
---
description: Plans changes and breaks them into tasks
mode: primary
model: opencode/gpt-5.1-codex
reasoningEffort: high
temperature: 0.1
permission:
  edit: ask
  bash:
    "*": ask
    "git status*": allow
    "git diff*": allow
    "git log*": allow
---

You are the architect. Understand the problem before proposing a solution.

Explore the codebase first. State assumptions explicitly. Break work into
concrete, ordered steps that name specific files.

Delegate wide codebase searches to @explorer instead of reading files
yourself — it keeps this conversation focused.

Do not write implementation code. That's @coder's job.
Why a custom architect instead of the built-in plan agent? Plan is deliberately read-only. If you want your planner to file tasks into an issue tracker or scratch a TODO file during the session, it needs edit permission. edit: ask gives you that without letting it rewrite your source.
~/.config/opencode/agents/edit.md:
---
description: Hands-on implementation with full tool access
mode: primary
model: anthropic/claude-sonnet-4-20250514
temperature: 0.2
permission:
  edit: allow
  bash:
    "*": ask
    "git push*": ask
---

You implement changes directly. Follow the plan you're given.

If the plan is wrong or incomplete, say so before writing code.
Two primaries is enough. Resist adding a third — you’ll spend more time deciding which one to use than they save you.
Step 3: Create your subagents
Three that earn their keep:
~/.config/opencode/agents/explorer.md — searches the codebase so your primary doesn’t have to hold every file it read:
---
description: Searches the codebase to answer specific questions. Use for "where is X" and "how does Y work".
mode: subagent
permission:
  edit: deny
  bash: deny
  webfetch: deny
---

Find what was asked for and report back concisely.

Return file paths with line numbers and a short explanation.
Do not paste large blocks of code unless asked.
~/.config/opencode/agents/coder.md — implements a plan handed to it:
---
description: Implements a specific, already-planned change
mode: subagent
model: anthropic/claude-haiku-4-20250514
permission:
  edit: allow
  bash:
    "*": ask
---

You implement exactly what you're told to implement. Nothing more.

You are given a plan. Follow it. If it's ambiguous, ask rather than guess.
Report what you changed and any deviations from the plan.
~/.config/opencode/agents/review.md — the important one:
---
description: Reviews uncommitted changes for bugs and quality issues
mode: subagent
temperature: 0.1
permission:
  edit: deny
  bash:
    "*": deny
    "git diff*": allow
    "git status": allow
    "git log*": allow
  webfetch: deny
---

Review the changes critically. Your job is to find problems.

Look for: bugs and edge cases, security issues, performance traps,
missing error handling, and tests that should exist but don't.

Be specific. Cite file and line. Do not praise. Do not fix anything —
report only.
The reviewer’s real value isn’t the read-only permissions — it’s the isolated context. It hasn’t sat through the conversation where you talked yourself into the design, so it evaluates the code on its own terms.
Two things that trip people up
Use permission, not tools. The tools field is deprecated. permission gives you the same on/off behavior plus per-command bash globs. Note that within a bash block, the last matching rule wins — so put "*" first and your specific allows after it.
Don’t give agents every tool. This came up as the top piece of advice in the source thread, and there are three separate reasons for it:
- Tool definitions consume context. A heavyweight MCP server can cost you a real chunk of the window before you’ve said anything.
- Narrow tools produce focused behavior. An agent that can’t wander off is easier to tune than one you have to talk out of wandering.
- Every subagent is a separate context budget. Delegating work is how your main session survives long enough to finish the feature without compacting.
Step 4: Create your commands
Commands go in ~/.config/opencode/commands/ or .opencode/commands/. Same rule — filename becomes the command name.
~/.config/opencode/commands/implement.md — hand the current plan to the coder subagent:
---
description: Implement the current plan via the coder subagent
agent: coder
---

Implement the plan we just discussed. $ARGUMENTS
Because coder is a subagent, this triggers an isolated invocation automatically. The implementation churn stays out of your planning conversation; only the summary comes back.
~/.config/opencode/commands/review.md — review what’s uncommitted:
---
description: Review uncommitted changes
agent: review
---

Review these uncommitted changes:

!`git diff HEAD`

Report issues in priority order.
The !`command` syntax runs a shell command and injects its output into the prompt. So the reviewer gets the diff handed to it directly instead of going and fetching it.
~/.config/opencode/commands/review-pr.md — the pre-merge check:
---
description: Review the whole branch against main before merging
agent: architect
subtask: true
---

Review all changes on this branch against the base branch.

Commits:
!`git log --oneline main..HEAD`

Full diff:
!`git diff main...HEAD`

Assess: does this actually accomplish what it set out to do? Is anything
half-finished, inconsistent, or left behind?
This one is the clearest illustration of subtask. architect is a primary agent, but subtask: true forces it to run isolated anyway — so you get your best reasoning model looking at the full branch with zero memory of how it got written. That’s the point. Freshness is the feature.
Also useful, since you’ll want linting on your terms rather than mid-draft:
---
description: Format, lint, and typecheck
---

!`npm run format && npm run lint && npm run typecheck`

Fix anything that failed above.
Step 5: Tell your primary agent to actually delegate
This step gets skipped and then people wonder why their subagents never fire. Delegation is driven by the description field and by your primary’s system prompt. If neither mentions the subagent, it mostly won’t get used.
Two levers:
Write descriptions as trigger conditions, not job titles. "Searches the codebase to answer specific questions. Use for 'where is X' and 'how does Y work'." beats "Codebase explorer" — the first tells the model when, the second only tells it what.
Name them in the primary’s prompt. Notice the architect prompt above says “Delegate wide codebase searches to @explorer.” That line does real work.
You can also constrain who’s allowed to call what:
{
  "agent": {
    "architect": {
      "permission": {
        "task": {
          "*": "deny",
          "explorer": "allow",
          "coder": "allow",
          "review": "ask"
        }
      }
    }
  }
}
Denied subagents are stripped from the Task tool description entirely, so the model won’t even try. You can still @-mention them yourself.
The daily loop
Tab → architect          Discuss the change. It uses @explorer to
                         investigate without flooding your context.

/implement               Coder subagent writes it. You see a summary,
                         not 40 tool calls.

/review                  Reviewer subagent checks the diff cold.
                         Fix what matters.

/check                   Format, lint, typecheck. On your schedule.

git commit               Repeat until the feature is done.

/review-pr               Architect, fresh context, whole branch vs main.

Merge.
Tuning notes from real use
Don’t isolate everything. The obvious move is /new between planning and implementation for a clean context. It’s usually wrong. The reasoning behind a plan — the alternatives you rejected, the constraint you discovered — makes the implementer better. Keep it. Isolate the review step, not the build step.
Consider turning off inline formatters and LSP. They interrupt at the worst moment: the agent is mid-draft and something is already complaining that the code isn’t perfect. It’s like a reviewer reading over your shoulder as you type. Push the checks into an explicit /check command and let the agent finish the thought first.
Personas are a real lever, not decoration. “Your job is to find problems. Do not praise.” produces noticeably different output than “review this code.” One developer in the source thread themes his whole roster — an adversarial tester, a pedantic memory-keeper, a grumpy ops agent — and reports the personalities genuinely shape behavior.
Add agents only when you feel the pain. Start with these six. When you notice yourself repeatedly explaining the same specialized context, that’s the signal to make a new one.